Sunday, June 30, 2013

Cleaning and Sanitizing your Make up Brushes

Hello Lovies!

It has been a week past since my last blog. Now, let me share with you I clean and sanitize my make up brushes without breaking my wallet. There are so many brush cleaners in the market from high end to affordable ones. But of course, if you are on a tight budget or let us say if you are practical like me; I would still prefer to clean my brushes in a traditional way.

Basically all you need are the following:

- Shampoo, soap (bar or liquid) or what I normally use is my body wash
- alcohol for sanitizing your make up brush after cleaning
- water
- clean towel

1. Dampen your used brush in a running water.


2. Pump a pea sized amount of your preferred cleaning agent. Swirl your brush until it produces a lather. If you will notice in this step, you will see the dirt (make up residue) slowly coming out as the lather changes its color. 


3. Rinse your brush thoroughly until the water is clean.


4. Now your brush is clean, place it in clean towel and spray some alcohol to sanitize it.


See, it is very simple. I hope you will find these steps helpful. Remember, being beautiful does not have to be very costly. Just be practical.

Here's a glimpse of my babies. Yeah, I need to bathe them now. ;D

My Face brushes:


My Eyeshadow brushes:


My Eyebrow and Eyeliner brushes (yeah, my spoolie is there)


Have a great week ahead my Lovies!!!
xoxo, Beautylash01

Sunday, June 23, 2013

Behind the Scene: Plum and Aqua Smokey Eyes

Hello everyone!

Almost MIA for the week. As a make up artist, it is really a fulfilling experience when you will do your relative's make up.

I am happy to share with you lovies some behind the scenes photos of my beautiful niece-- Roni.

Even without make up, she is absolutely stunning.


Products used:
Face: Maybelline Pore Eraser, Nichido Foundation, Sophie Martin concealer, ELF yellow corrector, BH cosmetics powder (contour palette).
Brows: Careline eyebrow pencil in brown
Eyes: MAC Painterly paint pot, Nichido Pencil in purple (base), Body shop baked eyeshadow in violet, Naked Palette 1 (blackest shade) to deepen the eyes, Nichido pencil in Aqua (lower lashline), Maybeline mascara, Nichido Pencil in Onyx.
Contouring: Benefit hoola bronzer, ELF Luminance 
Lips: Sophie Martin Lip stick in Natural shade and Nichido Lip liner in Rosette

To set the make up: I sprayed some of my D.I.Y. Mac setting spray

Tah da!!!! The fierce Roni!!!


Have a great one my lovies!!
xoxo, Beautylash01

Friday, June 14, 2013

Review: Nichido Multiple Stick

Hello my Lovies!

I am back wit another affordable make up review. Numerous Youtube Beauty gurus have been raving about this product and so I want to see and test it for myself. Last Wednesday, I managed to go to Watson's and visited Nichido counter. The beauty representative told me that this multiple stick is actually on 50% discount. Hmmm... Good deal! The real price of this baby costs at Php 188, I got mine for only Pp 94.

I got the shade Sunset Glow, it is a coral peach shade and as matte finish. The size of the product may be a bit expensive if you will be paying in full amount. Another shade is South Beach-- rosy pink color and has a gold shimmer in it. That shade somehow reminded me of ELF Blushes. Nichido claims that it is a multiple stick, you can use it a blush, eyeshadow and liptint. Well for me, this is only good as a blush.


Sharing with you my swatch of Sunset Glow in my hand:


Yes, it is pigmented and easy to blend so a little goes a long way. However, I have noticed, you need to set it with a translucent powder or pressed powder because if not, this may tend to be a big source of oiliness in your face.

When applied and blended:


PRO's:
  • very pigmented
  • affordable
  • easy to blend
  • does not have any funky smell
  • a bit dewy so it is not that dry
CON's:
  • very limited shade they only have 2 shades.
  • always set with powder as this may be oily 


Generally speaking, I still recommend this product. May you find this review helpful and have a great weekend my lovies!!
xoxo, Beautylash01

Sunday, June 9, 2013

80's inspired eye make up

Hello Gorgeous Ladies!

It has been truly a great weekend for me. Chill, spent time with fam bam and my love. Nothing to do really, when I came across ASAP 18. They have showcased 80's music and dance-- and there came my inspiration for this make up look.

Vibrant and playful-- like a rainbow! Do not be afraid to combine colors. Always remember blending is the key.

In this tutorial, I have only used 1 palette. I purchased this online in a multiply site of Legally Vain. By the way, they also sell beautiful make up traincases and more palettes.

Below is my step by step tutorial in creating a fun and colorful eye make up. I am so sure this will remind you of a rainbow!

1. Always remember to prime your eyelids. This will prolong the staying power of your eyeshadow and will prevent from creasing especially if you have oily eyelids. In this look, I used my NYX JUmbo pencil in Milk. The whiteness and the consistency will make my eyeshadow pop more. The heat of your finger will make it more blendable.


2. Blend in your yellow eyeshadow. You may opt for a matte yellow. But this, I prefer a slightly shimmering eyeshadow as I would like to attract more light in photos. Blend it all across your eyelids up to the crease.


3. Blend in a bright pink in the outer half of your eyelids. Make sure you blend it well and will have a gradient transition from yellow to pink.


4. In your outer "V" blend in bright violet eyeshadow. This will emphasize the shape of your eyes. Also, this will create an illusion of a deep set eyes.


5. Using a thin and precise eyeshadow brush, blend in black eyeshadow to cut crease. Blend it well, this will contour a deep set eyes.


6. To make this eyeshadow more vibrant, using your round eyeshadow brush, blend in bright blue eyeshadow. (this color is very 80's) :) Apply it the out part of the eye. Blend, blend and blend my love!


7. Using your small eyes shadow brush, highlight your inner tearduct using a champagne eyeshadow color.


8. To balance the eye make up, blend in the same blue eyeshadow to the outer 3/4 of your lower lashline. Line your waterline with black eye pencil and blend it well. Line your eyelids with black eyeliner (very thinly) as close to your lashes. Curl your lashes and apply mascara. I put on some falsies baby for this look for a more dramatic effect.


And here is the finish look. I am so in love with this make up and I will definitely try it again for parties and girls night out.


Hope you enjoy this tutorial and may you find it helpful.
Follow me on:
Instagram: aprilvida
Facebook: Beautylash01 by April Vida

Have a great ahead and God Bless,
xoxo Beautylash01

Sunday, June 2, 2013

Neutral Smokey Eyes.. Perfect for First date or Clubbing

I'm back my loves been missing in action lately! :P

I have been loving my go-to smokey eyes lately and been receiving requests on a step by step tutorial how I do it.  I used affordable make up for this look. I am just not sure if Forever21 still has this eyeshadow quad available here in the Philippines. But you can definitely substitute this look using same shades of eyeshadows.

Let us get this going:

Product I used:
ELF Quad, NUYTX Jumbo pencil in Milk (available from Digital Traincase, Forever21 Quad Shadow (dupe for Naked1), Black eyeliner, liquid eyeliner, Saizen Quad, Saizen Falsies, Charm fluffy tapered brush, Suesh eyeshadow flat brush, Artist Studio pencil brush

Note: You have the option to do your eyes make up first before doing your foundation. This method will avoid eyeshadow fall-outs. Fall outs ruin make up!! But on my case, since I have been doing this almost everyday I did my foundation routine already beforehand.

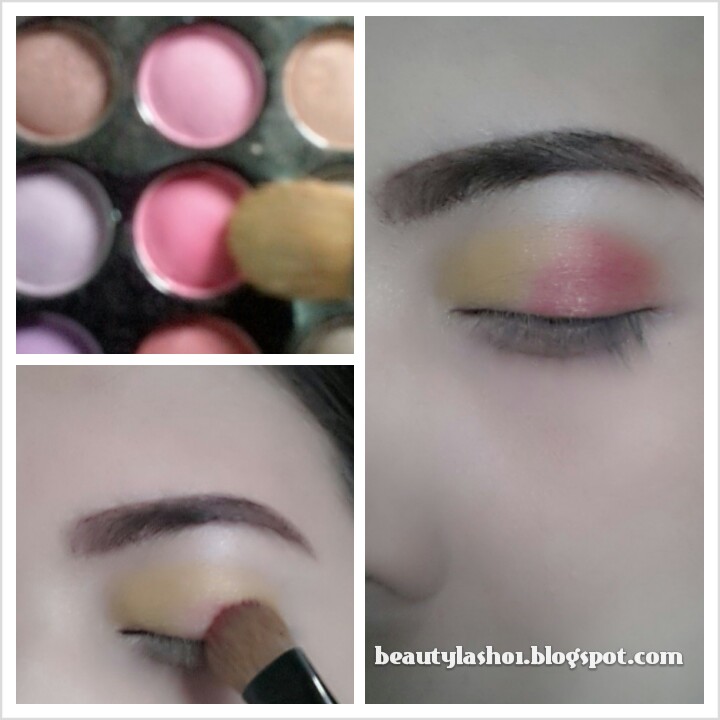
1. Using NYX jumbo pencil in milk, prime your eyelids. This will make your eyeshadow pop and lasts longer. I use my ring finger in blending the product. The natural heat of the finger will melt and blend the product.


2. Using your flat eyeshadow brush, pat in Warm Brown eyeshadow all across your eyelid. Blend the harsh edges using your fluffy shadow brush.


3. To create dimension on your eyes, blend in Dark brown eyeshadow in the outer "V" of your eyes. Remember blend the harsh edges to create a gradient effect.


4. For a deeper smokey look, blend in your dark grey eyeshadow (closely black) to the outer "V" again of your eyes to make a deep set look.


5. Using a small flat eyeshadow brush, highlight your browbone and inner tearduct with a white shimmering eyeshadow.


6. Using the same small flat eyeshadow brush, line 3/4 of your lowerlashine using dark brown eyeshadow connect it with upper eyeshadow. This will balance the smokiness of your eye make up.


7. Apply liquid eyeliner (depending on your choice). Apply as close to your lashes. Line 3/4 of your waterline with black eyeliner. Blend it with the dark brown eyeshadow.

8. Curl your lashes and apply generous amount of mascara. (everyday look), OR you may go ahead and apply false lashes for a more dramatic look (perfect for clubbing).


9. Generally, you want your eyes to be the centre of your look, use any nude lipstick or baby pink. In my case, I am loving my Sophie Martin Lipstick in shade baby pale pink. The shade is so close to my natural lip color.


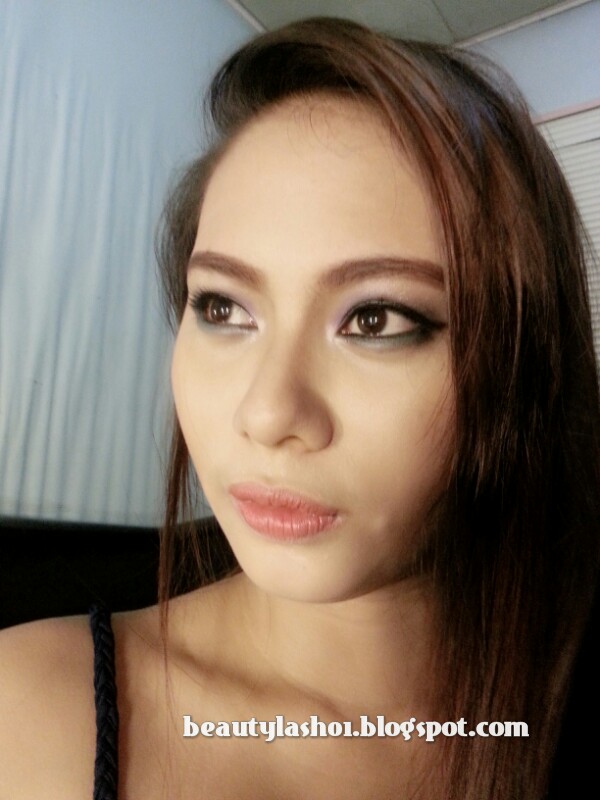
And here is my before and after photo for this make up tutorial


I hope you will find this tutorial very helpful. Please recreate this look and tag me in my instagram account or FB Fan page. I would love to see your beautiful creation.
Instagram: @aprilvida
FB: Beautylash01 by April Vida
xoxo, Beautylash01