Saturday, October 5, 2013

Product Review: MAC Lady Danger Lipstick


This week has been a tough one for me. I think I need to reward myself with a new shade of lipstick from MAC that I think I dont have in my collection. To be inside a MAC store is like being a kid inside a candy shop.. I just love everything there.. There is this magnetic field that keeps attracting me to the lipstick rack... This gorgeous "Bright Coral-red" baby simply catches my eye.. Tried it and without any further hesitations... This MAC Lady Danger is coming home with me.. :D

My thoughts on this product:
It is a bold bright red orange lipstick with warm undertone and with matte finish. Leaning more on the red side than the orange. I have been loving MAC Lipstick because of the longevity and pigmentations--makes worth the amount of money you need to pay.

I tested the longevity of the product last night when I had dinner with friend. I ate a lot, and to my surprise the lipstick stays closely intact to my lips most likely about 5-6 hours and leaves a stain behind.

The consistency is not drying and not to creamy, no foul smell and flavor which is a big plus. The color coverage is so awesome and intense.

Heres a pic of me wearing MAC Lady Danger


xoxo, Beautylash01

FB: Beautylash01 by April Vida
Instagram: @aprilvida


Make-up Tutorial: Go Bold with Gold

Hey Ladies,

I miss doing this! Oh yes, I have been missing in action and been very busy with work and my new online bizz. I am always been a fan of Gold. I am happy to share with you my favorite gold make up as I have previously posted in my instagram account.

Hope you like it and if you recreate this look, please upload it in my facebook page and in tag me in instagram.

1. In this tutorial, I have proceeded with my foundation routine, did my eyebrows and conntouring.

2. Using a light gold eyeshadow, wash it all over your lid.
* Ooops, always prime your eyelids.

3. Using a clean blending brush, apply a 1-tone darker gold eyeshadow to your outer "V'.

  4. With a pearly white eyeshadow, highlight your browbone using a small eyeshadow brush.


5. Intensify the eye-socket using a matte chocolate brown eyeshadow. This will create an illusion of a deep set well contoured eyes. Blend it well.

 
6. Go back and apply some dark gold eyeshadow to your lower lash line. Sweep it up to the inner 3/4. Leave the 1/4 for your tearduct highlight.


7. Highlight your inner tear duct to make your eyes more awake and emphasized. Use the same pearly white eyeshadow that you have used for your browbone highlight.


8. Line your eyes with a dark brown or black cream eyeliner, curl your lashes and apply mascara. To add more glam, apply your falsies.

and here is the finish look:


thank you my loves!
xoxo, beautylash01

FB: Beautylash01 by April Vida
Instagram: @aprilvida


Saturday, August 10, 2013

Makeup Tutorial: Flawless Foundation (products used less than Php 300 each)

Hello Everyone,

It has been a long time since my last blog. I am cleaning my make up traincase and thought of this affordable make up tutorial. I did several make up tutorials and noticed that I missed the essential one-- flawless face.

Yes! Achieving a flawless canvass should not be expensive especially when you are using make up everyday.

Calling all the working girls, here is a great tutorial for yah!!

Make up used in this tutorial costs less than Php 300 only:

1. Quick Fx Mattifying Primer: Php 89 available at Watson's
2. Nichido Matte Foundation: Php 289 available at all Nichido Make up counters
3. Sophie Martin Concealer: Php 220 you may contact anyone with Sophie Martin membership
4. L.A. Color Loose Powder: Php 249 available at all L.A. Colors make up counter


1. After toning and applying moisturizer on your face, apply a pea-sized amount of QuickFX Primer.

Apply it even on you face, you will feel the silkiness of your skin after applying. Concentrate on the part of your skin where you tend to be oily. In my case, I concentrate in my T-Zone area.

2. After applying your primer, you have the option of applying your concealer first then foundation. But for me, I prefer to apply my foundation first, as I would like to measure the coverage I want.


I look funny right? But as my best practice, I measure where I want more coverage. Blend the foundation in an outward motion using your foundation brush. You may also your hands in blending but make sure it is clean. Normally, if I will use a foundation brush, I still blend it with my hand so it is smooth and well blended. Apply some on your neck. :)

3. Once everything is applied, identify which part of your face needs to be concealed. Normally, it would be your undereye area, sides of the nose, sides of the lips, pimple scars, cupid's bow etc.


Blend the concealer using your ring finger. The natural heat of the finger will melt the product and blending will be easy. This method will prevent your make up from caking.

4. Seal it with a loose powder. RULE OF THUMB: Apply liquid, cream first then seal it with a powder. This will prolong your make up and prevent your make up from caking. Thus blending will be easier.


I seal first with a powder the areas where I applied concealer. The consistency of a concealer is much more dense and creamy than a foundation. The product itself is somehow oily so you need to lock it with a powder.

** Optional: If you will apply eyeshadow, you may also apply eyeshadow primer after concealing. Eyeshadow primer will make you eye-make up last longer and will prevent from creasing.

Dust your face with the loose powder using a powder brush.


Noticed how my face turns to be a smooth and flawless canvass. Now, you may go ahead and do your eyebrows, apply eyeliner, mascara, blush and some light contouring, lipstick and skip the eyeshadow part. These make up routine is so easy and so fresh-looking. On a lazy day, this is my make up routine. I save so much time.

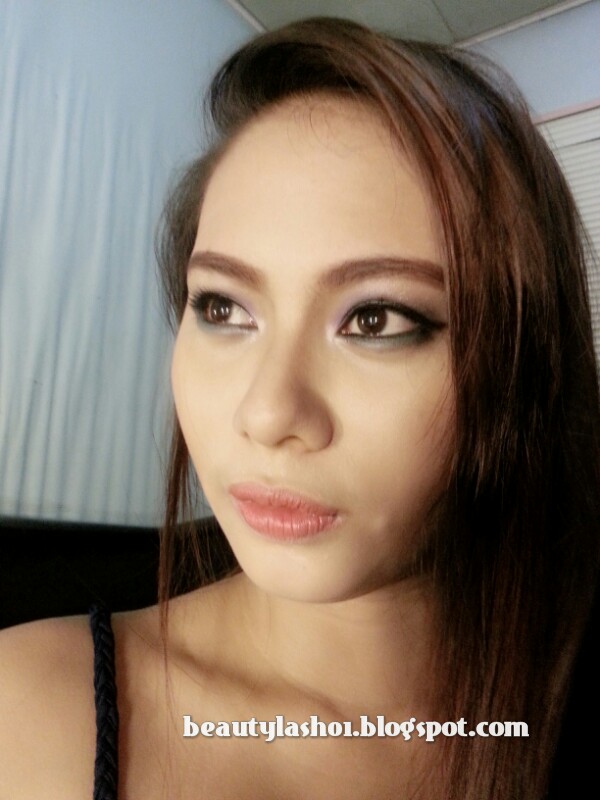
Tadaahh! here are some snippets of the finished make up look.


Take care everyone and stay beautiful,
 xoxo, Beautylash01

Facebook: Beautylash01 by April Vida
 

Sunday, July 14, 2013

Tutorial: Day to Night Make up Look

I am back! I am so happy that I have already finished my workshop at The Makeup Artistry. I attended Basic Make up and Advanced Make up lessons. It was awesome and fun since I was joined by my two lovely friends from the Hotel Industry.

I am so inspired to share with my Day to Night office make up. I have used my Naked Palette 2 in this look, you can go ahead and substitute the colors and just follow the shades of eyeshadow if you do not have Naked Palette 2.

In this tutorial, I have my foundation, did my contouring and highlighting as well as my brows. Alright, let us get this started.

1. Always, prime your eyelids. There are many options for this, if you are on a budget, ELF cosmetics has a great eyelid primer. For this tutorial, I used MAC Painterly Paint Pot. Remember, never skip this part especially if you have oily eyelids. This will make your eyeshadow last longer and will make the color pop.

2. Using a flat eyeshadow brush, pat all over the lids Foxy. This is a matte whitish shade. This will be your base color.


3. Once blended, using a fluffy eyeshadow brush, sweep in a windshield motion Chopper or a shimmery copper shade in the outer corner of the eyes.


4. To highlight the eye make up, use Bootycall or any shimmery white eyeshadow, highlight your brow bone and inner tear ducts.


Tadaah, the finished day look! 
** Line your eyes thinly with dark brown eyeliner, curl your lashes and apply mascara.


5. To achieve the night out look, using a small dome brush, sweep in the outer V  of your eyes, Busted or any darl copper eyeshadow. Blend it well and create a "wing-like" motion.


6. Using a small flat eyeshadow brush, sweep and highlight your inner tear duct using Half Baked or any shimmery gold eyeshadow and extend it to the inner 1/4 of your lower lash line.


7.. Using Pistol or any dark taupe shimmery shadow, pat it in the outer 3/4 of your lower lash line. Make sure to blend and connect it with the winged eyeshadow.


8. To complete this look and be perfect to Night outs, make sure to add false lashes and line your lower waterline with black eyeliner. Exaggerate your eyeliner by flicking the wing and extending it a bit longer, creating a Cat Eye look.

Sharing with you the transition of this make up:


Night out look taken in my make up chair:


Hope you find this tutorial helpful! Have a great week ahead my lovies!
xoxo, Beautylash01

Sunday, July 7, 2013

Product Review: Kohl / Kajal / Dry Eyeliner

Hi Everyone!

I am so happy to share with all of you that I am currently attending make up workshops at The Makeup Artistry, so I can share more make up technique and tips to all of you. Yesterday, during my workshop, I came across this -- Dry Eyeliner or commonly known in the Middle East as Kajal. No second thought, I purchased the product for only Php 250 (50% discount), originally priced at Php 500 (I think).

I am truly amazed with this product. It has been my problem that whenever I will line my waterline with black eyeliner, regardless if it is high end or dupe, I always end up having a Panda eyes.. Yes, my eyeliner smudges all the time, so as an option I always top it with black eyeshadow.

Generally, kajal or kohl liner is ideal for waterline. You can also use it at eyeliner to upper lashes but you have to top with black eyeshadow. Kajal eyeliner, glides easily on the waterline. This is meant to be creamy, and once applied a cool sensation. 

PROs:
- does not smudge in the waterline
- so black and perfect for smokey eyes
- no foul / pungent smell
- handy and can fit your make up purse
- no need to sharpen
- glides easily
- claims to protect the eyes from infection since it is made naturally


CONs:
- quite expensive
- not readily available in Philippines
- can be messy if not applied properly


Product swatch:

(Top: 1 stroke application; Bottom: Hand soaked in water)

I hope you find this review helpful, be careful Loves when buying Kajal Eyeline, there are fakes that is not manufactured naturally nor made from cosmetics instead made from soot.

Stay beautiful always.. inside and out!
xoxo, Beautylash01

Facebook: Beautylash01 by April Vida

Sunday, June 30, 2013

Cleaning and Sanitizing your Make up Brushes

Hello Lovies!

It has been a week past since my last blog. Now, let me share with you I clean and sanitize my make up brushes without breaking my wallet. There are so many brush cleaners in the market from high end to affordable ones. But of course, if you are on a tight budget or let us say if you are practical like me; I would still prefer to clean my brushes in a traditional way.

Basically all you need are the following:

- Shampoo, soap (bar or liquid) or what I normally use is my body wash
- alcohol for sanitizing your make up brush after cleaning
- water
- clean towel

1. Dampen your used brush in a running water.


2. Pump a pea sized amount of your preferred cleaning agent. Swirl your brush until it produces a lather. If you will notice in this step, you will see the dirt (make up residue) slowly coming out as the lather changes its color. 


3. Rinse your brush thoroughly until the water is clean.


4. Now your brush is clean, place it in clean towel and spray some alcohol to sanitize it.


See, it is very simple. I hope you will find these steps helpful. Remember, being beautiful does not have to be very costly. Just be practical.

Here's a glimpse of my babies. Yeah, I need to bathe them now. ;D

My Face brushes:


My Eyeshadow brushes:


My Eyebrow and Eyeliner brushes (yeah, my spoolie is there)


Have a great week ahead my Lovies!!!
xoxo, Beautylash01

Sunday, June 23, 2013

Behind the Scene: Plum and Aqua Smokey Eyes

Hello everyone!

Almost MIA for the week. As a make up artist, it is really a fulfilling experience when you will do your relative's make up.

I am happy to share with you lovies some behind the scenes photos of my beautiful niece-- Roni.

Even without make up, she is absolutely stunning.


Products used:
Face: Maybelline Pore Eraser, Nichido Foundation, Sophie Martin concealer, ELF yellow corrector, BH cosmetics powder (contour palette).
Brows: Careline eyebrow pencil in brown
Eyes: MAC Painterly paint pot, Nichido Pencil in purple (base), Body shop baked eyeshadow in violet, Naked Palette 1 (blackest shade) to deepen the eyes, Nichido pencil in Aqua (lower lashline), Maybeline mascara, Nichido Pencil in Onyx.
Contouring: Benefit hoola bronzer, ELF Luminance 
Lips: Sophie Martin Lip stick in Natural shade and Nichido Lip liner in Rosette

To set the make up: I sprayed some of my D.I.Y. Mac setting spray

Tah da!!!! The fierce Roni!!!


Have a great one my lovies!!
xoxo, Beautylash01

Friday, June 14, 2013

Review: Nichido Multiple Stick

Hello my Lovies!

I am back wit another affordable make up review. Numerous Youtube Beauty gurus have been raving about this product and so I want to see and test it for myself. Last Wednesday, I managed to go to Watson's and visited Nichido counter. The beauty representative told me that this multiple stick is actually on 50% discount. Hmmm... Good deal! The real price of this baby costs at Php 188, I got mine for only Pp 94.

I got the shade Sunset Glow, it is a coral peach shade and as matte finish. The size of the product may be a bit expensive if you will be paying in full amount. Another shade is South Beach-- rosy pink color and has a gold shimmer in it. That shade somehow reminded me of ELF Blushes. Nichido claims that it is a multiple stick, you can use it a blush, eyeshadow and liptint. Well for me, this is only good as a blush.


Sharing with you my swatch of Sunset Glow in my hand:


Yes, it is pigmented and easy to blend so a little goes a long way. However, I have noticed, you need to set it with a translucent powder or pressed powder because if not, this may tend to be a big source of oiliness in your face.

When applied and blended:


PRO's:
  • very pigmented
  • affordable
  • easy to blend
  • does not have any funky smell
  • a bit dewy so it is not that dry
CON's:
  • very limited shade they only have 2 shades.
  • always set with powder as this may be oily 


Generally speaking, I still recommend this product. May you find this review helpful and have a great weekend my lovies!!
xoxo, Beautylash01